普段はWebプログラマ~な自分からすると、Swingのレイアウトマネージャーって、非常に使いづらい。「そんなんだから Adobe Airに・・・」なんてことが出掛ってしまうぐらい使いづらい。そんなSwingですが、Scalaを利用して実装すると少しはマシになるな~というのを実感する今日この頃なので、少しずつScalaでのSwingの利用方法を紹介できたらなんて思っています。そんでもって、まずはBoxPanelクラスを紹介しようと思います。
Scalaではパネルを設定するのにPanelクラスとレイアウトマネージャがセットになっている以下のクラスを利用するようになっています。
- BorderPanel
- BoxPanel
- FlowPanel
- GridBagPanel
- GridPanel
BoxPanelを定義し、コンポーネントを配置する方向を指定する
BoxPanelは下記のように定義します。
This file contains bidirectional Unicode text that may be interpreted or compiled differently than what appears below. To review, open the file in an editor that reveals hidden Unicode characters.
Learn more about bidirectional Unicode characters
val panel = new BoxPanel(Orientaion.Horizontal) |
引数のOrientation.HorizontalでPanel内に追加したコンポーネントを配置する方向を指定します。
Orientationクラスで用意されている定数は
Horizontal ・・・ 横向きにコンポーネントを配置する
Vertiacal ・・・ 縦向きにコンポーネントを配置する
の2種類になります。
以下はコンポーネントを配置する方向を指定した簡単なサンプルです。
This file contains bidirectional Unicode text that may be interpreted or compiled differently than what appears below. To review, open the file in an editor that reveals hidden Unicode characters.
Learn more about bidirectional Unicode characters
package simple | |
import scala.swing._ | |
object SimpleBoxPanel extends SimpleSwingApplication { | |
def top = new MainFrame { | |
title = "Simple BoxPanel" | |
contents = new GridPanel(1, 2) { | |
preferredSize = new Dimension(400, 100) | |
// BoxPanel内のコンポーネントを縦向きに配置 | |
contents += new BoxPanel(Orientation.Vertical) { | |
contents += new Label("こんにちは") | |
contents += new Label("ご機嫌") | |
contents += new Label("いかがですか") | |
} | |
// BoxPanel内のコンポーネントを横向きに配置 | |
contents += new BoxPanel(Orientation.Horizontal) { | |
contents += new Label("こんにちは") | |
contents += new Label("ご機嫌") | |
contents += new Label("いかがですか") | |
} | |
} | |
} | |
} |
結果はこちらのようになります。
コンポーネントの表示位置を設定する
BoxPanelではコンポーネントの表示位置を指定することができます。コンポーネントの表示位置はそれぞれ
xLayoutAlignment ・・・ 水平方向の表示位置
yLayoutAlignment ・・・ 垂直方向の表示位置
で指定できます。
どちらのプロパティも0.0から1.0の値を指定することで、表示位置を指定します。
また、java.awt.ComponentクラスのStatic 変数を利用することもできます。
以下はコンポーネントを配置する方向を指定した簡単なサンプルです。
This file contains bidirectional Unicode text that may be interpreted or compiled differently than what appears below. To review, open the file in an editor that reveals hidden Unicode characters.
Learn more about bidirectional Unicode characters
package simple | |
import java.awt.Color | |
import java.awt.Component | |
import java.awt.Dimension | |
import javax.swing.border._ | |
import javax.swing._ | |
import scala.swing._ | |
object BoxPanelSample extends SimpleSwingApplication { | |
def top = new MainFrame { | |
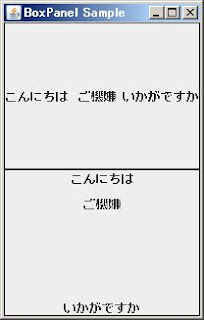
title = "BoxPanel Sample" | |
contents = new GridPanel(2, 1) { | |
preferredSize = new Dimension(200, 300) | |
contents += new BoxPanel(Orientation.Horizontal) { | |
border = new LineBorder(Color.BLACK) | |
contents += new Label("こんにちは") { | |
yLayoutAlignment = Component.CENTER_ALIGNMENT | |
} | |
contents += new Label("ご機嫌") { | |
yLayoutAlignment = Component.CENTER_ALIGNMENT | |
} | |
contents += new Label("いかがですか") { | |
yLayoutAlignment = Component.CENTER_ALIGNMENT | |
} | |
} | |
contents += new BoxPanel(Orientation.Vertical) { | |
border = new LineBorder(Color.BLACK) | |
contents += new Label("こんにちは") { | |
xLayoutAlignment = Component.CENTER_ALIGNMENT | |
} | |
contents += new Label("ご機嫌") { | |
xLayoutAlignment = Component.CENTER_ALIGNMENT | |
} | |
contents += new Label("いかがですか") { | |
xLayoutAlignment = Component.CENTER_ALIGNMENT | |
} | |
} | |
} | |
} | |
} |
結果はこちらのようになります。
Swingクラスを利用して、隙間を挿入する
BoxPanelでは、Swingクラスを使用して追加するコンポーネントの間に隙間を挿入することができます。固定領域を挿入する場合は
Swing.RigidBox(new Dimension(10,10))というようにRigidBoxメソッドを利用します
また可変長領域を挿入する場合は
Swing.GlueというようにGlueメソッドを利用します。
先ほどのサンプルに隙間を挿入してみます。
This file contains bidirectional Unicode text that may be interpreted or compiled differently than what appears below. To review, open the file in an editor that reveals hidden Unicode characters.
Learn more about bidirectional Unicode characters
package simple | |
import java.awt.Color | |
import java.awt.Component | |
import java.awt.Dimension | |
import javax.swing.border._ | |
import javax.swing._ | |
import scala.swing._ | |
object BoxPanelSample extends SimpleSwingApplication { | |
def top = new MainFrame { | |
title = "BoxPanel Sample" | |
contents = new GridPanel(2, 1) { | |
preferredSize = new Dimension(200, 300) | |
contents += new BoxPanel(Orientation.Horizontal) { | |
border = new LineBorder(Color.BLACK) | |
contents += new Label("こんにちは") { | |
yLayoutAlignment = Component.CENTER_ALIGNMENT | |
} | |
// 固定長領域の挿入 | |
contents += Swing.RigidBox(new Dimension(10, 10)) | |
contents += new Label("ご機嫌") { | |
yLayoutAlignment = Component.CENTER_ALIGNMENT | |
} | |
// 可変長領域の挿入 | |
contents += Swing.Glue | |
contents += new Label("いかがですか") { | |
yLayoutAlignment = Component.CENTER_ALIGNMENT | |
} | |
} | |
contents += new BoxPanel(Orientation.Vertical) { | |
border = new LineBorder(Color.BLACK) | |
contents += new Label("こんにちは") { | |
xLayoutAlignment = Component.CENTER_ALIGNMENT | |
} | |
// 固定長領域の挿入 | |
contents += Swing.RigidBox(new Dimension(10, 10)) | |
contents += new Label("ご機嫌") { | |
xLayoutAlignment = Component.CENTER_ALIGNMENT | |
} | |
// 可変長領域の挿入 | |
contents += Swing.Glue | |
contents += new Label("いかがですか") { | |
xLayoutAlignment = Component.CENTER_ALIGNMENT | |
} | |
} | |
} | |
} | |
} |
結果はこちらのようになります。
0 件のコメント:
コメントを投稿